xcodebuild -destination for Simulators: how agents pick a device
The xcodebuild -destination option is a set of comma-separated key=value pairs that tells xcodebuild which device to build, run or test on. For an iOS Simulator, a coding agent should read the booted devices with xcrun simctl and pass one identifier, not a device name it remembers. This guide is for people who run Claude Code or Codex against Xcode projects. On a Macswarm Pod the Simulators are already booted and XcodeBuildMCP is installed, and the Free plan covers 3 Pod-hours with no card.
Which -destination string should an agent use?
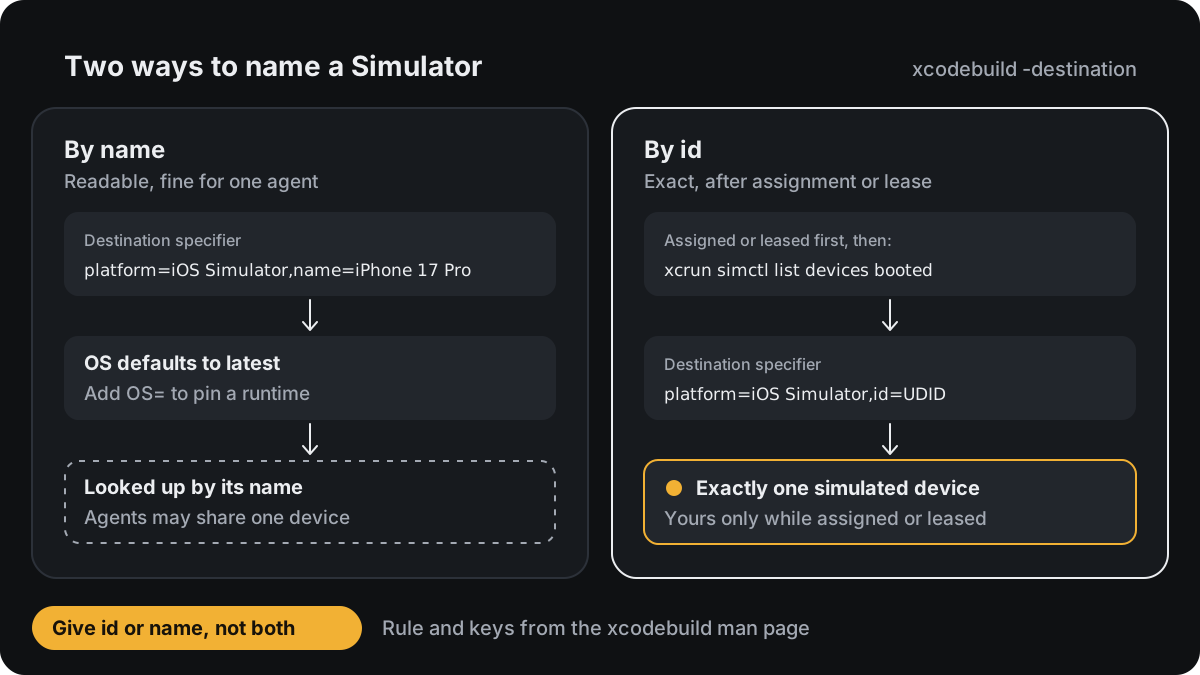
For an iOS Simulator, an agent should pass -destination 'platform=iOS Simulator,id=<UDID>', with the UDID of a device assigned to that agent and read with xcrun simctl list devices booted. The xcodebuild man page defines a destination specifier as one argument of comma-separated key=value pairs, and for the iOS Simulator platform it accepts id, name, arch and OS. A valid specifier gives id or name, never both. A name such as name=iPhone 17 Pro is readable and works for one agent on one Mac, and OS then defaults to latest. An id is exact: it selects one simulated device, so two agents that hold different ids cannot land on the same Simulator. On your own Mac the agent has to boot a device first. On a Macswarm Pod three to four Simulators are already booted and leased to agents in turn, and Claude Code, Codex and XcodeBuildMCP are installed next to the Latest Xcode.
Start free with 3 Pod-hours, no card
The xcodebuild options below come from its man page (man xcodebuild). The simctl usage comes from the tool’s built-in help, xcrun simctl help and xcrun simctl help <subcommand>, which Apple ships with Xcode and does not host online; run the same commands to read it. Both were read on 14 November 2026 from a current Xcode installation. Device names such as iPhone 17 Pro are examples; use the names your Mac lists.
What goes into a destination specifier?
Apple’s Xcode documentation describes a run destination as the simulated or physical device you pick next to the scheme, and says Xcode fills that menu based on the scheme you select (developer.apple.com, checked 14 November 2026). On the command line the same choice is the -destination option. Without it, the man page says xcodebuild “defaults to a destination that is compatible with the selected scheme”, which is not something an agent should leave to chance.
| Key | What the man page says | Use it when |
|---|---|---|
platform |
One of the supported platforms; for a simulated iPhone or iPad it is iOS Simulator |
Every specifier |
id |
The identifier of the simulated device, as shown in the Devices window | An agent needs one exact device |
name |
The name of the simulated device | A person types the command, or one agent runs alone |
OS |
With name: the iOS version, or latest, which is the default |
The app must be checked on an older runtime |
arch |
Optional architecture, such as arm64 or x86_64 |
A build must target one architecture |
Source, checked 14 November 2026: the xcodebuild man page that ships with Xcode, read with man xcodebuild; the same text is mirrored at keith.github.io, a community copy, not an Apple page.
Three more rules from the same page matter to agents:
- A specifier is a single shell argument. The man page notes that arguments with spaces must be quoted or escaped, and
iOS Simulatorhas a space, so the whole specifier goes in quotes. -destinationcan be repeated to run the action on several destinations.-destination-timeoutsets how longxcodebuildsearches for a device before treating it as unavailable. The default is 30 seconds.
How does an agent find booted Simulators?
With simctl, the Simulator command line tool that Xcode runs through xcrun. Its help text says list prints devices, device types, runtimes or pairs, and takes a search term that is matched against each item’s description.
-
List the booted devices. Add
-jfor JSON, which is easier for an agent to parse than the text table.xcrun simctl list devices booted xcrun simctl list -j devices booted -
If the list is empty, list what is available and boot one.
bootstatuswith-bboots the device if needed and returns when it has finished booting.xcrun simctl list devices available xcrun simctl bootstatus <UDID> -b -
If no suitable device exists, create one. The help text gives the form
simctl create <name> <device type id> [<runtime id>]and says the newest compatible runtime is chosen when none is named. Device types and runtimes come fromxcrun simctl list devicetypesandxcrun simctl list runtimes. -
Make sure the device is this agent’s alone before using its UDID. Listing does not reserve anything: two agents that read the same list can copy the same UDID. On your own Mac, whoever starts the agents assigns one device to each, for example by creating one per agent. On a Pod, use the device of the agent’s current lease.
-
Pass that UDID to every later command for as long as the assignment or lease lasts, and stop using it once the device is returned or the lease expires.
One trap: simctl accepts the word booted in place of a UDID, and its help text says that when several devices are booted it “will choose one of them”. That is fine with one Simulator and wrong with four. An agent that shares a Mac with other agents should name its UDID in every simctl call.
Build, test and launch on that Simulator
The actions and options are from the man page; MyApp and the paths are examples.
-
See what the scheme can run on. This does not start a build.
xcodebuild -showdestinations -project MyApp.xcodeproj -scheme MyApp -
Build for the chosen Simulator.
xcodebuild build -project MyApp.xcodeproj -scheme MyApp \ -destination 'platform=iOS Simulator,id=<UDID>' -
Run the tests on it. The man page says
testneeds a scheme and optionally a destination; give both, and turn parallel testing off so the run stays on the one device (the reason is under “Several agents on one Mac”).xcodebuild test -project MyApp.xcodeproj -scheme MyApp \ -destination 'platform=iOS Simulator,id=<UDID>' \ -parallel-testing-enabled NO -
Install and launch the built app with
simctl, using the same UDID. The bundle identifier is your app’s.xcrun simctl install <UDID> path/to/MyApp.app xcrun simctl launch <UDID> com.example.MyApp
To check the previous iOS major by name instead, add the OS key, for example 'platform=iOS Simulator,name=iPhone 17 Pro,OS=<version>', with a version that xcrun simctl list runtimes shows as installed.
Common destination errors
A specifier that xcodebuild cannot match to a device stops the command before the action runs. This page does not quote the error text, because the factory could not save a readable Apple source for it on 14 November 2026. The causes below are inferences from the man page’s rules, not a list Apple publishes.
- The name matches nothing. A device name that exists on a laptop may not exist on another Mac. Read names and ids from
simctlor-showdestinationsinstead of writing them from memory. - The OS has no runtime.
OS=must name an iOS version that is installed. Apple’s documentation says that without platform support installed for the target, you cannot build and run the app on a device, and points to Xcode’s Components settings to add it (developer.apple.com, Markdown version, checked 14 November 2026). - Both
idandnameare given. The man page calls that specifier invalid. Give one. - The shell split the argument. An unquoted
platform=iOS Simulator,...becomes two arguments. Quote the whole specifier. - The device is slow to appear. The search stops after 30 seconds by default;
-destination-timeoutraises it. simctlacted on another device. With several Simulators running, a command that usedbootedletssimctlchoose one of them. Use the UDID.
Running xcodebuild -showdestinations with the same project and scheme is the first check: the man page says it lists the valid destinations for that project and scheme.
Several agents on one Mac
One Simulator per agent is the rule that follows from all of the above. Each agent gets its own device by assignment or lease, and uses that UDID in every xcodebuild and simctl call while it holds the device.
Two kinds of concurrency are easy to confuse. The first is parallel test workers inside one destination. Apple’s release notes for the Xcode version that introduced parallel testing say that on Simulator each test runner process executes on a separate clone of the selected simulator (developer.apple.com, Markdown version, checked 14 November 2026). Those clones are extra devices that nobody assigned or leased, so a pool that counts devices per agent does not see them. The man page says -parallel-testing-enabled [YES | NO] overrides the scheme’s setting; pass NO when the run must stay on one assigned Simulator.
The second is several destinations in one command. When one xcodebuild test command names several Simulator destinations, the man page offers -maximum-concurrent-test-simulator-destinations <number> to limit how many test at a time, and -disable-concurrent-destination-testing to run them one after another.
Builds are the other shared resource. They compete for the same CPU and memory, which is the subject of parallel xcodebuild for coding agents.
What does XcodeBuildMCP change?
XcodeBuildMCP, now named MobileBuildMCP, wraps these commands as tools so the agent does not assemble destination strings itself. Its session defaults store the project or workspace, the scheme and the Simulator once, and later tool calls reuse them (mobilebuildmcp.com, checked 14 November 2026). The same page lists the options that correspond to a destination:
simulatorId, a Simulator UUID, andsimulatorName, a name such as iPhone 17. If both are set,simulatorIdwins.useLatestOS, a boolean that selects the latest available OS for the Simulator.platformandarch.
The same page says the agent stores defaults through session_set_defaults or picks them up from .mobilebuildmcp/config.yaml, and that setting disableSessionDefaults: true restores explicit parameters on every call. For parallel agents the advice is the same as with raw xcodebuild: set simulatorId, not a shared name. Setup for both agents is in XcodeBuildMCP setup for Claude Code and Codex.
How does this work on a Macswarm Pod?
A Pod is a macOS virtual machine for one developer, cloned fresh from a golden image and destroyed ten minutes after that developer’s last session ends. What it changes in this loop, from Inside a Pod and Limits and queues:
- Simulators are booted before the agent arrives. Three to four devices per Pod, on current iOS and the previous major, with the Latest Xcode. The boot and create steps above are not the agent’s job.
- Simulators are leased, not grabbed. An agent leases a device for a launch or a test run and returns it to the pool. A lease that sits idle for five minutes is released, and extra requests queue.
- Builds take turns. Two
xcodebuildruns per Pod at once; a waiting agent keeps working on something else. - XcodeBuildMCP is installed, next to Claude Code and Codex.
Two things follow for destination strings. Use the identifier of the device the agent currently leases, and stop using it once the lease is returned or released after five idle minutes; never commit a UDID to a script, since the docs do not say whether identifiers repeat between Pods. And how a lease hands a device identifier to the agent is not documented; write to info@macswarm.com if your test scripts depend on it.
Pods bill per second while they run. Free is 3 Pod-hours once, with no card; Pro is $99 a month for 300 Pod-hours and up to four Pods at a time (pricing). The quickstarts for Claude Code and Codex cover the connection.
When is your own Mac enough?
- One developer, one agent. A name-based destination and a Simulator you boot yourself cost nothing extra.
- You test on a physical iPhone or iPad. That is
platform=iOSwith a deviceidorname, plus code signing. A Pod comes with Simulators, not devices. - You want to watch the Simulator. A Pod has no screen sharing; you follow the agent through its session, logs and screenshots (Security).